Thursday 30 October 2014

When God makes a beautiful women... by mellpellmell (Maria Potapovich)

Hi)
It's mellpellmell (Maria Potapovich) here for you today.

Sometimes I want to do some little thing just to cheer up. To smile sometimes when you find this little thing somewhere among things.

This time I made a little book with aphorisms about us - about women. Indeed even though we are different, but all women are really women!!!


The end)))))

It was simple - I have just added a little white dots through a stencil, color pencils, few butterflies from hole punch and drew little doodles with gouache pens.

For this book I've used the Gibson Girls Plate stamps


Are you real woman? ;)  Or.. do you know one of them? )))))

Good day!

Monday 27 October 2014

Gift Bag with Blossoms

Hello Everyone,
Shilpa here,
Festive season is in full swing and we all need cute little gift bags to share love with family and friends. Being a crafter we like to create them with personal touch, don't we?
I would like to share with you today, a gift bag I created with a very pretty Artistic stamper blossoms stamp.


I've created this paper bag with 12"*12"  cardstock. It is very easy to make with Envelope punch board, you can find the you tube tutorial here.


On other watercolor paper I stamped Debbie cotton designed Blossoms stamp image with Ranger black Archival Ink. I colored the image with different Distress inks mixed with water. I fussy cut it and adhered it to the bag.


Hope you liked my project today.
Stamped images on gift bags is beautiful idea, do try it with wide range of Artistic stamper stamps!!
See you next month.

Supplies used:

Thursday 23 October 2014

Halloween Triptych Arch


Hi everyone I hope you are all well. I have a simple home made
 triptych arch Halloween project for you today. 

Home sweet Home stamps, Tim Holtz mini blueprints. White 
crackle embossing paste, blackVersa fine ink,
black clay, Paperartsy paint,
Black acrylic paint. 


I started by cutting out the three arches out of mount board. I then cut
 out three smaller arches.


I painted three tooth picks with black acrylic paint, these were then used to form 
the hinges for the triptych. Masking tape was used at the back to hold the 
tooth picks in place and I painted it black to blend in with the 
mount board. I covered the smaller arches with a mix 
of white and black embossing paste.


I covered the smaller arches with a mix of white and black embossing paste. 
Once dry I covered the arches with crackle paste and 
allowed to dry naturally.


I rolled out some black fimo clay and used the home sweet home stamps
 to stamp into the clay, I then baked the houses in the oven.


Once the crackle paste had dried I painted it with a mix of claret and spanish mulberry,
I highlighted the area's around the houses with pumpkin soup.


I stamped a web,  bat and spiders of tim's small blueprints plate in 
versa fine ink and clear embossed it. The houses were
 brushed with guilding wax.


I stuck it all together glued the bat  to the top of the middle arch and a 
spider to each side.


That's it for today I hope you enjoyed the post please
 feel free to leave a comment or two.
Cheers Dee x


Tuesday 21 October 2014

Upcycling...

Hello happy crafters ! this is Titbelsoeur showing you today an album made with upcycled stuff AND an Artistic Stamper stamp as a background on each and every page : Family Values from the Collage & Retro collection :


 Here are the pages :


I am sure you noticed on the last page that I also used the "Art" stamp, from Collage Art, and the rule from Ephemera 1, both in the same collection as Family values.

The covers are all made with upcycled things (buttons, chicken wire, fridge light bulb, coffee pad, zip, hand-made beads, etc etc...) :


I was happy to show you this album I am proud of !
I will demonstrate how to do it on November 11th
 in a workshop at my place near Versailles, France, 
and hope it will give you some inspiration to make one of your own !
Thank you for stopping by, I am looking forward to reading your comments.
See you,

Saturday 18 October 2014

Autumn Leaves Card by Alison Hall

Hello Stampers! I was inspired by the beautiful colours of the Autumn trees to make this card.


Here's what I used...

Round Paint Brush (or waterbrush)
Cardstock for matting & layering - Green & Gold
7ins Square White Card 
Double sided tape

Here's what I did...

1.  I cut a piece of smoothy white card 5 1/2 ins square, used all three distress stains to ink the leaves, & stamped them on the card. I stamped the phrase, using potting soil archival ink

2. I dabbed some distress stains onto a craft mat, then used the round paint brush to pick it up & splatter.

3. Next, I sprinkled some gold embossing powder over the leaves & melted it with the heat gun.


4. I layered my artwork onto some green and gold card, then onto a white card blank to finish.

I hope this inspires you to make some Autumn cards.

Thanks for visiting,

Alison xxx

Friday 17 October 2014

The family is a little home.

I have a wonderful stamp with collage - it illustrated happy family and relevant inscriptions ...


Despite the fact that the stamp is good in itself, I wanted to make with it something interesting, but better - something a bit philosophical.

Therefore, this image appeared on the big house, made ​​of gypsum.
As well as butterflies began coexist with this family - as if hinting at ease and a wonderful family atmosphere.


To make the background a little more interesting, I added to it the structural paste, in which I've put the stamp "Stars", as well as a little spray of vintage colors.


And so a great decoration for the home is ready!


Due to the design features, it is not too heavy, but it looks very imposing)))))


And, sorry, one more photo)))))


I hope you liked the idea of ​​a large decoration for home)

See you)
And have a good day!

Maria Potapovich (mellpellmell)


Wednesday 15 October 2014

Memories - Journal Page

Hello Everyone, Happy Wednesday!!
Shilpa here,
Couple of days back I shared with you my new journal and how I created it's vintage cover. If you have not seen it, here is the link- Layered Journal cover

And today, I created my first journal page in it. This is inspirational project as we have 'Memories' theme for this month's challenge.


I have used 'Faces' stamps from Artistic Stamper. They have vintage look and perfect for memories journal page.

.
I had fun playing with layers and texture. I started my first layer with book pages. And next layers were - washi tapes, design paper strips, canvas strips, lace. After this, I applied white crackle texture paste through Tim Holtz Star stencil.


I applied gesso at some places and when it dried I stamped with texture stamps and Ranger black Archival Ink. Next, I spritzed inks in various red, golden and brown colors, I dried them between each layer.


I created same texture on both sides of page.


Middle part of the page has various paper layers which I created with stamping, distressing, coloring. 

here are some of the close- ups......


Hope you liked my project, do let me know your views in comments.
Don't forget to join us for our monthly challenge to win beautiful Artistic stamper stamps.

Supplies used:
Artistic stamper stamps: FacesCalligraphy Mat 13,
Tim Holtz Layering stencil - stars
From my stash Washi tapes, gauze.

Monday 13 October 2014

The Book Of Halloween


Hi everyone how are you! anyone who follows my blog will know that I attended the Artistic Stamper Birthday BBQ @ this event I met the talented Mark Gould who was demonstrating
the new Deco Art Media Range and I had a chance to play. To cut a long story short I have
fallen in love!!! with this product so this post is all about the range and Tim Holtz texture
fades and stamps All products can be purchased through the Artistic stamper
if you can't find them on the website then e-mail Jenny,
 she will be able to get them for you.


1. Tim Holtz Halloween Night,  Poison texture fade & Compass texture fade.
3. The compass stamp of indigo blue Grand tour 111.
4. stampotique  bat wings
10. Treasure gold.


Firstly I used Tim Holtz texture fades and plain white card which I ran through my
Vagabond machine. I did quite a few sheets of card as I was 
covering the two books with them.


I mixed the prussian blue media fluid with white acrylic paint and then
painted the entire book with it.


Next I used white antiquing cream knocked it back with damp cloth then buffed up 
with a soft cloth I then covered it with black antiquing cream
 and heat dried with my gun.


Once I was satisfied with the look I brushed the entire surface with Americana 
Decou Paige matte medium to seal it. 


Firstly I used grey board and put Tim's Halloween Night fade through my machine
I coloured it with a mix of prussian blue and yellow to make a green
a bit of gold as well. Once dry I covered the entire piece with
 black antiquing cream dried then knocked back with a damp cloth. I then sanded it 
to make it stand out. I Sealed the entire panel with matte medium.


I stamped the wings onto card with black versa fine and then clear embossed them I
 coloured with watered down media fluid and sprayed with a mica 
spray to make them shimmer and glow.


I stamped the skull from Tim's plate onto craft coloured card then highlighted the teeth 
with white paint. I stamped the artistic stamper clock onto white card and covered
 in rangers crackle glaze, once it had crackled i run the edges with versa
 mark and then copper embossing powder.


I finished of the front panel with black fimo clay stamped and 
coloured with treasure gold.


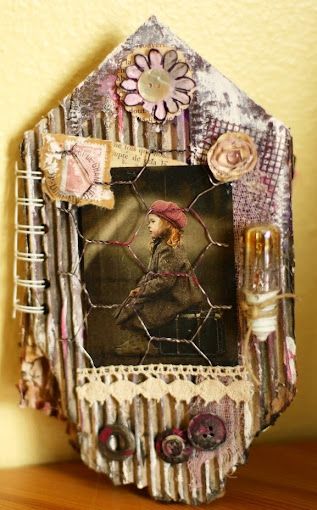
 Here is a view of the back of the box as I was working 
on it 


The back finished I just love the way you can layer up 
the Media range the possibilities are endless.


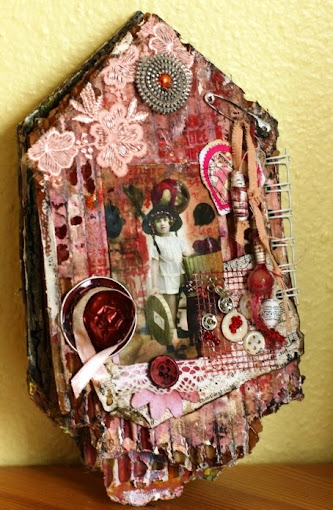
The inside of the box I used the compass texture fade. I painted the
 base with the blue then used red oxide antiquing cream then a
 bit of white in area's.


The faux pages I used burnt umber watered down then treasure gold
I followed the same process for the second box. just changing
 the mix of colours.


This is the back view.


I used the fimo clay here to do the compasses. I rolled out the clay,
and stamped into it with the Compass of tim's classic plate and the
indigo blue compass. 


I used Spanish Topaz once they had been baked in the oven, to highlight.
I assembled the skull with a screw brad through a cog and a 
circle of coloured card.


The clock and wings were fixed to the top of the skull. I used a silk
rope that I glued around the edges of the main box to finish it off.
Please remember to seal with a media varnish the media range
 has a few to choose from.


The final layer of this project is a book which sits inside the 
second box.


As this post has gone on and on how to make this the book and how to make the pages 
inside can be seen over on my blog  @ deeadamsart.blogspot.co.uk


I hope you have all enjoyed this blog as much as I have enjoyed creating it. 
Don't forget you can e-mail Jenny for any of the supplies that 
don't show up on the website. I would love to hear what 
you all think! so please feel free to leave a 
comment or two.
cheers Dee x