Saturday 29 October 2016

Note Board by Gemma Hynes

 Hello Everyone

For my post today I wanted to share with you all a little note board I created on a piece of black chipboard. It's supper handy to hang next to my table to keep track of supplies used in projects or those very handy to do lists.


Cut a piece of chipboard to the desired size and mask off a boarder around the edge with low tack tape, then paint a layer of yellow acrylic paint over the top.


Place the honeycomb over the top and sponge through some red acrylic paint, remembering to check the bottom of the mask for paint before moving and lining it up to the next section. 


Mix the left over red and yellow paint together, apply this to the honeycomb background stamp and in random places stamp over the whole board.


Taking some white acrylic paint and the same stamps, stamp over the whole board, this time ensuring most of the board is covered. Then using black archival ink stamp over the top of the whole board with a calligraphy mat


Add the word notes to the top of the board and stamp the bees from the honeycomb stamp set in both the top right and bottom right corners. Glue your note pads in place I make mine from plain printer paper.


I stamped the word happy from the framed words 1 set between the two bees at the bottom. To finish remove the tape from the edges of the board and punch two hole in the top to add string so the board can be hung in place.


Thank you for reading, Please leave us comments and tell us what you think, The next creative challenge will be starting shortly and I can not wait to see everyones entries.

Gemma Hynes

Monday 24 October 2016

Inspiration...... by Debs

Hi Everyone

Here is my latest project using the theme of this months challenge - Patterns.  Sorry its a bit dark,  these dark evenings are not good for photographing projects!!


This was journal page which started life as one of those pages that you use up paint and paste on.
This page had some texture and some colour and i just thought the texture would make a good start for a new page


 Followed by some Bubblegum Pink and London Blue

 i then added some stencilling using assorted mini stencils from The Artistic Stamper
 Using the same colours again over the top or the original

 Gradually building up the background
 Using the Lesley Matthewson pattern 2 mask i added some White Linen Dylusions paint 

 
I added some stamping into the background with Calligraphy Mat 11 and Mini Polka Dot using Archival black ink

Loving your entries so far this month.  Still a week to go so lets see what else you can all come up with.
Debs


Tuesday 18 October 2016

Herring can by Titbelsoeur

Hello there,
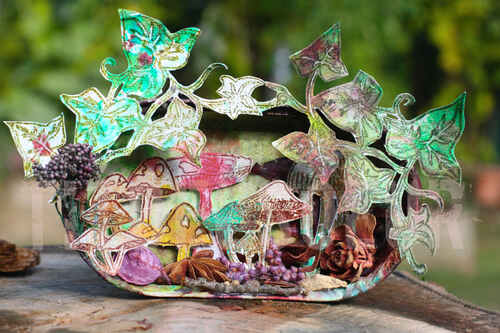
A new mushroom-in-can project today, not a sardine can but herring one !
And the "paper" is different as well... I have made it with dirty paper towel for random colors, I have glued a single sheet of it on to greeting cards and then cut out :


Sardine can with stamped Mushrooms A5 Plate © Tit Belsoeur

Stamps I used :
Mushrooms A5 Plate © Tit Belsoeur
Ivy © Lesley Matthewson

stamped with various Archival Inks

Do not forget to participe in our

Octobers' Creative Challenge- Patterns

 to win some fabulous Artistic Stamper stamps !

Titbelsoeur

Sunday 16 October 2016

Imagine Notebook by Gemma Hynes


Hello Everyone

This months challenge is patterns, you can interpret this theme anyway you want, as long as it includes stamping, I created this notebook with a patterned cover. You can enter the challenge here on the blog or here on the facebook page.


I started by collecting together most of the items I wanted to use, My base was an old sweet packet that I cut down to the size of the canvas and chalk board sheets.


I coated the canvas sheet with two layers of Dylusions Squeezed Orange Paint


Once dry I placed the Honeycomb Mask over the top and sponged Dylusions Vibrant Turquoise through it. I seeped under the mask in some areas but I really like it.


After some more drying time I placed the Random Dots  mask over the top and sponged through Dylusions White Linen


 I then glued the canvas to the cardboard packet and folded the edges around to the other side. Afterwards I found the middle point on both sides punched holes and added gromits, which I threaded string through to tie the book closed


After stamping the word imagine to the bottom corner using Framed words one, I cut to size and glued a chalkboard sheet to the inside of the cover before gluing the spine of the papers into place.


Thank you for reading, 
Please leave a comment to let us know what you think, 
and join in this months fun themed challenge
Gemma Hynes


Monday 10 October 2016

Patterned ATC's by Debs

Hi everyone


For a complete change today i decided to make some ATC's

Using some watercolour paper and some PaperArtsy Infusions in Violet Storms, Blackcurrant and a Little bit Jaded.  Sprinkled the infusions on the paper and then spritzed with Water.  Dried it all off with a heat gun and then added some stamping 


I used Punk Plaid, Dots, Sequin Waste and calligraphy mat 11 using Potting Soil Archival Ink


I then cut it into ATC's and then used a different stamp on each one


Butterfly from Butterflies 2 with Seize the moment from Journaling words 3


If you would like one of these ATC's just let me know what you think and comment which one you would like.  I will allocate ATC's on a first come first served basis.
Have fun and i look forward to seeing your entries into the pattern challenge.   

Friday 7 October 2016

Patterned card by Titbelsoeur

Hello everyone !
Titbelsoeur today to present you a simple card where patterns are repeated again and again with 3 different stamps : Floral Open Background with 2 Free Flower stamps , Cogs Background and the big watch from Tick Tock A5.
And on the center, one of these forever beautiful .


I have first colored the background with Distress ink, then stamped the Gibson Girl is stamped with Blue Archival ink, cut out a mask of this stamp on to a post-it I sticked on the stamped image, and stamped the cogs with grey, the watch with blue and the flowers with crimson.
And sticked the cardstock on to a card :


Do not forget to participe in our

 to win some fabulous Artistic Stamper stamps !

Titbelsoeur

Monday 3 October 2016

Winner of September's Challenge

Hi! 
Thank you to everyone who joined in our September challenge , which was Monochromatic.
We had some lovely entries, and Mr. Random.org has chosen


 as the winner with this lovely card.
Congratulations, and please email me so you can choose your prize.
Don't forget we have a new challenge which is Patterns, and can be found here.
We look forward to seeing your creations
Have a creative day
Jennie x

Saturday 1 October 2016

Octobers' Creative Challenge- Patterns

Hi!
Welcome to our monthly blog challenge!
A big thank you to everyone who joined in last month's challenge. We had some gorgeous creations, and I will be announcing the winner of September's challenge in the next couple of days.
This month the challenge theme is Patterns

You can interpret it any way you like, as long as there is rubber stamping in it.


To join in with this challenge (we are limiting the challenge entries to 3 per person), is simple; all we would like you to do is, make a piece of artwork, making sure that you include the theme and some rubber stamping. Pop back here to link up using the Inklinkz at the bottom of this post, so that we can see what you've made and then, leave us a comment to let us know you have joined in with the challenge.
 As always, there will be candy for one randomly picked entrant - the winner will receive a stamp of their choice from The Artistic Stamper

In addition, you can enter the same challenge on Facebook!  

To join us on just go to our new Facebook group, and send us a request to join..  There will be a prize for the Facebook challenge, as well as the blog challenge!

And don't forget....if you use The Artistic Stamper stamps on your entry, you will entered into the draw, twice!

Here is some creativity for you from the Creative Team to help you get started....


I have used Distress crayons for basis of my project, they are great for building up colour and applied them through a selection of Artistic stamper masks.  Then using the ornate flourish 1 stamps and one of the background stamps from the Family values plate


The support of my project is a soda can I have crushed and colored with alcohol inks.
Then I have sticked 3 times the same mushroom from the Mushroom Plate I designed for The Artistic Stamper, and also the word "inspire" from Framed Words #1
This can is actually a mailart I have sent to a friend of mine.
 
I had already created the background on these altered book pages, and just added a pattern through Lesley's pattern mask with PaperArtsy Fresco Finish Paints. I stamped  a calligraphy mat through it with archival ink. Finally I added dots of paint on the pattern. 


We hope that you will join in this month's challenge, and also join us on Facebook too.We look forward to seeing your creations. Don't forget to add a comment when you have posted your entry.

Have a creative month

Jennie