Saturday 30 October 2010

The Hangman's Tree - By Hels Sheridan

Goodly Morning Peeps! Tis me, Hels, with yet more Hallowe'en stuff... I know, this year I have gone a bit Hallowe'en bonkers and today is no different... in fact... I have some "treat" news... yes, indeedily, the Spooky Pumpkins hanging ATC that was up for grabs last week now has a new owner. Using Random.org, I popped all the numbers into the mix, asked the nice man at Random.org to chose a number out for me... and the number picked is #11 - which belongs to the comment left by GINI. Please can you email me your deets and I will pop the ATC into the post for you :O))


So... today's spooktastic offering is made up from those divine Art Parts from Wendy Vecchi... now, I have spoken to Jennie about these here Art Parts... they are currently out of stock... however, if you give Jennie a call she will be able to take a pre-order over the phone - call 01795 531860. Right, business side of it done, I can wax lyrical about how I made this... well, what shall I call it? Erm... Art ...doesn't seem the right word to use... how about... hommage to all things spooky? LOL


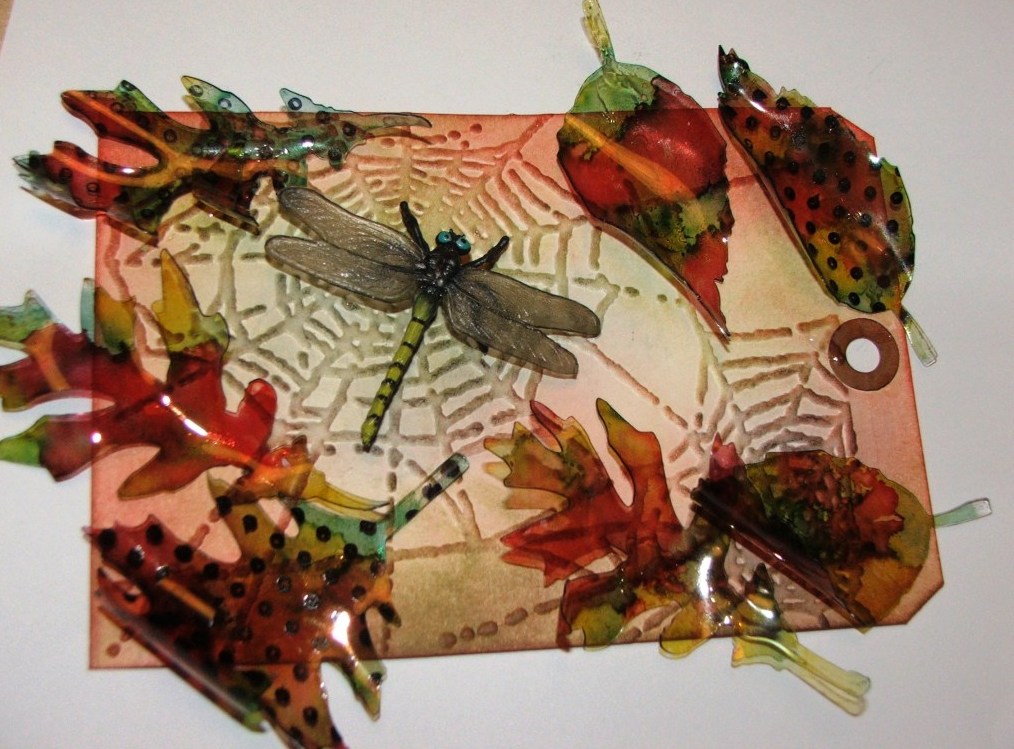
I covered the Art Parts with papers from the Retro Grunge stack (I have to say... I LURVE this stack... mainly cos the papers are perfect for just covering stuff and not having to ink the whole lot... lazyness abounds aplenty LOL) Once the components were covered, I then went on to cut out a Picket Fence Alterations Die using Mountboard... this was coloured with Distress Inks and then curled and fashioned around the middle of the Art Part. Oh and I forgot to say... the Art Parts had a few of Tim Holtz's Hallowe'eny images stamped onto them too :O))


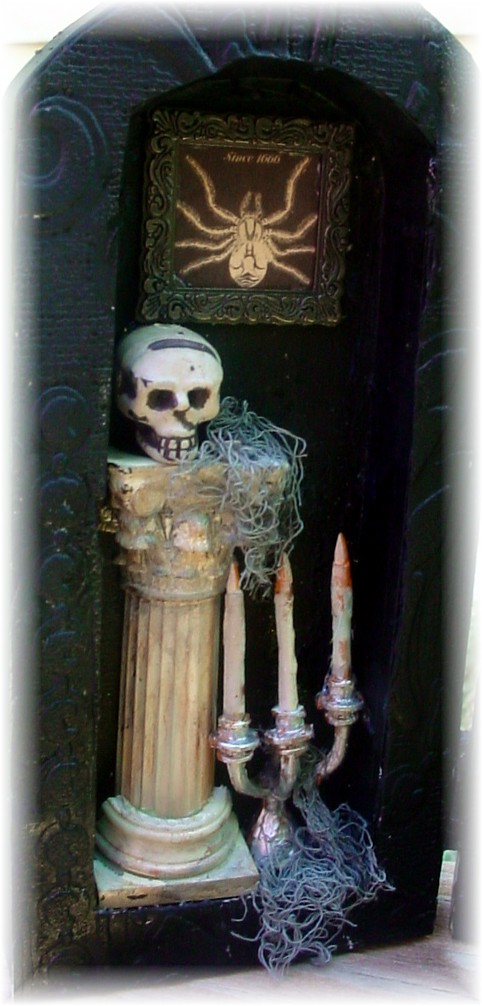
Next came the time consuming bit... I wanted some mini pumpkins... and haven't got any charms or embellies that would work... so I hit on the idea of making some... using Fimo! Now, Fimo and I have not had the best of relationships so imagine my delight when it moulded really well and turned into a pumpkin... never one to look Mr Ed in the chops, I decided to make a few more... and then got all ambitious and made some toadstools too. I have made some... Fly Agaric... there, aren't I clever knowing the proper name??? Not really, Mr Google helped me ROFL The skelingtons were a lovely RAK from Joanne and I knew as soon as I saw them that they were destined for the Art Parts piece that was in my head... so THANK YOU to Joanne... she is a sweety! Well, that's all folks... thank you for looking... have a grand weekend... TTFN

Hels x

PS - just remembered... if you fancy, you can click to receive an email newsletter from The Artistic Stamper... keeping you up to date with all the new arrivals and special offers too... the button is just over there on the sidebar :O))

Thursday 28 October 2010

The Bird Lady - By Lynn Stevens

Continuing on as a Guest Designer for The Artistic Stamper, I created a journal using the newest
I thought they went perfectly with the Bird cage Women image from Graphics 45 paper.
Added some lace an embossed leaf image on my cuttlebug and sanded it back. A touch of crinkle ribbon and your ready to have a great journal for birdwatching or just everyday use.
See more of my art at my blog Trash to Treasure Art
Thank you I have so enjoyed creating for The Artistic Stamper this month.
Lynn Stevens

Monday 25 October 2010

The Best Dressed Snowman by Tina Barnett

Hi Gang!

I am in LOVE with Stitchels Snowmen stamps by the wonderfully talented Hels Sheridan. They are available at The Artistic Stamper

This is Marty! So so cute! The stichels Snowmen and Snowladies make such amazing and cute cards.

I have also used two of the Stitchels Holly Stamps too. Marty and the holly stamps have been coloured using Promarkers.


I love making Easel cards because you can use different things for the "buffer" of the card. This time I have used ribbon.


I have also put ribbon under the main image and added a little bell charm.


I then finished off with some of my favourite perfect pearls in a little random pattern at the base of the card. The stamps make wonderful Christmas Cards of course, but also I would use them for invitations to a Christmas party. There are different Snowmen and women in the range, you must take a look! I have coloured them all so I am sure you will see more here and on my blog :0) xx

Thank you for looking and don't forget to pop over to The Artistic Stamper and look at the full range of Stitchels stamps. I would love to see what you make.

Bye for now!

Tina xxxx


Saturday 23 October 2010

Spooky Pumpkins...

Morning Peeps! Tis me again, back with another ATC to giveaway... this time it is a Hallowe'en themed one... using those luverly Tim Holtz Hallowe'en Mini's... I have to say, this is my first foray into the whole Hallowe'en thing this year and I am a total convert... I can see this skelington being used for things other than spooky too!


So, the base of the ATC was made with a piece of the Retro Grunge paper stack, coloured with Wild Honey and edged with Vintage Photo Distress Inks. The spider web was stamped with Brushed Corduroy and the bats and barbed wire with black StaZon. I stamped the skelington onto Grungepaper and cut him out and then once he was in place on the ATC, I added Glossy Accents to make him pop... however! The pics for some reason, are showing him to have a whiteish tinge to him... not sure why cos the GA is all dried... but I quite like it... it looks more... erm... lived in ROFL I have some beaded fringing in my stash which is white and pearly... so I made up a Mini Mister of Spiced Marmalade Re-Inker, mixed with Heirloom Gold Perfect Pearls and water, soaked the fringe with this mix and then dried it. I added some wire to the top of the ATC to make it into a hangy thing.. well, you know me and my hangy things... love 'em ;o))


If you would like to own this ATC, pretty please leave me a comment here and I will pop all the comments into the Random.org thingy and a winner, chosen at random, will be announced next Saturday, 30th October '10. Oooh, and while I am on about all things winning... have you seen our monthly challenge? The theme this month, set by moi, is Layers... and you can win £15 worth of Artistic Stamper stamps and KlingOn to mount them onto if you join in... that is open until October 31st... so you still have a week to play :O)) All the deets for that are HERE. Hope you have a brill weekend and thanks for looking... TTFN

Hels x

Thursday 21 October 2010

Free as a Bird - by Sioux Jenneys

Hello everyone! It's my turn (Sioux) again and I'm here to share an ATC :)


1. Created the background on watercolour paper by swooshing Distress Ink Tattered Rose and Scattered Straw

2. Stamped the Gibson Girl 4 in Adirondack Archival Jet Black and coloured with Distress Inks Worn Lipstick for the lips, Tattered Rose for the face and Rusty Hinge for the hair 'cos she looks like a red head to me! LOL. Cut and Dry Nibs make this really easy as you can pick out the finest detail.
3. Stamped the bird cage from the Free as a Bird plate and embossed in gold and the sentiment in Adirondack Archival Jet Black
4. The corner detail was, in effect, a free stamp!! It was on one of my Artistic Stamper plates that obviously had been left behind as part of the manufacturing process...not saying yours will have one for sure but you never know!! Just inked up the area I needed :)


5. Tattered the edges and inked up with Distress Ink Brushed Corduroy to finish off.

6. Could not stop myself and did what I do a lot with ATC's and made it into a card
....adding a T!m corner scroll (Ooh! I do love that stamp!) in Distress Ink Pumice Stone (second stamping) and sentiment in Adirondack Archival Coffee


See you soon!

xoxo Artyjen

Tuesday 19 October 2010

Double, double toil and trouble...

Fire burn, and cauldron bubble... an apt quote from Shakespeare's Macbeth's three witches, and one that sums up Halloween perfectly! If you wanted to be part of the phenomena surrounding Halloween this year, then you definitely need Mr Holtz's dies and embossing folders. I know, you are saying, "but I don't do Halloween", but neither do I! However the embossing folders and stamps, and the dies are amazing, and work perfectly for lots of other times apart from Halloween.
However with the 31st of October nearly upon us, I thought I would make a little tag or it could even be the front of a card using the above said dies and stamps.

I used the witch die by cutting out some Duralar and inking it with lots of brown alcohol inks, and then heating it gently , and moulding it. The tag ( made from the new tag die) was embossed and distress inked with Brushed corduroy, and Vintage Photo, and I cut out the top of the die , and added the Halloween words from Tim's Mini Halloween stamps. The witch is just attached with a drop of Glossy Accents so she is flying on top of the skeleton and bird! I am thinking I need a new 3D camera so you can see the way the witch sits :))

The bat was die cut in card and dipped into some gold and black UTEE, and the words were stamped onto a paint chip pinched from the local paint shop by my DH! It was a perfect co-ordinating colour!

Hoping you have a very Creative day.
Jennie

Saturday 16 October 2010

Poison Comes In Little Bottles...

...aha, just like precious things come in little packages... bit like me really LOL Anyways.. HELLO!!! I am back today with a double whammy for you... firstly... did you know that here on the Artistic Stamper Creative Team blog there is a monthly challenge??? You didn't??? Well, there is... and... this month the theme, set by yours truly, is to use LAYERS on your artwork **click the wordy to find the post :O))** The rules are simples... all you need to do is make a piece of art, be it a card, ATC, wall art, altered art... just use some stamping and the theme... and... if you use Artistic Stamper stamps on your entry you will be entered into the draw twice! The prize is £15 worth of stamps from the Artistic Stamper shop... along with the KlingOn to mount them onto... so... whatcha waiting for??? :O)) Actually, before you dash off to get creative... please let me introduce you to my latest tag creation...


Yes, I finally have succumbed to all things Hallowe'en and got myself a couple of sets of Tim Holtz Collection stamps... BTW, if you click on the blue words that will whisk you off to the exact page on the AS webby... so you can do a bit of shopping too... see, I am an enabler LOL The background of the tag is coloured with a mix of Distress Inks; Rusty Hinge, Spiced Marmalade, Dusty Concord, Aged Mahogany and Black Soot around the edges... however, before I did the colouring bit I used a script stamp and a birdy stamp and some Pearl Dabber to make a resist effect. Once coloured the images really pop off the page... just simply wipe off the ink from the paint and voila, resisted!


The Skelington is stamped in Pearl Dabber and embossed with white embossing powder... then cut out.. he is on Grungepaper so he is quite supple.. if Skelingtons can be supple LOL The Poison is another Tim stamp - one of the Mini Hallowe'en... stamped, inked and popped onto a titchy bottle that has Espresso Alcohol Ink dropped into to make the ... poison!


I added some Fragment Charms... these are made by inking cardstock, stamping the image you want and then using Glossy Accents to stick the Fragment to the card... simply wait til dry, cut out, edge with a sanding block to smooth it down and then use Black Soot to finish the cut edges... these are hung from the tag by poking a hole thru and making a twist of wire and a Jump Ring. The Ticket is from the 100th Collection from Mr Holtz ...cut using the Ticket Alterations Die and this is attached to a Memo Pin. So.. my layers are the Fragments and the Skelington... and the little Calendar Page... also a Tim Mini Hallowe'en stamp. I hope you get chance to play at the challenge... it is open until October 31st and the winner is chosen by Random.org and announced the following week :O)) Thanks for looking... have a FAB weekend! TTFN

Hels x

Thursday 14 October 2010

Second Hand Rose - By Lynn Stevens


I am so enjoying being a Guest Designer for The Artistic Stamper.
I had so much fun creating my Second Hand Rose collage box. I used several stamps from
Time and Keys plate and Girl With Clock
Along with Grungepaper for my Rose, Idealogy numbers, crackle paint and Distress inks.
All of which can be found at The Artistic Stamper.
The images are from Graphics 45. The Steampunk collection.
Thanks for looking!
Lynn Stevens

Wednesday 13 October 2010

It's Christmas time............. by Tina Barnett

Hello Everyone!

This adorable little Mabel Lucie Attwell stamp is available at The Artistic Stamper

I love this little one! So cute. While I was making this card I had a idea! Yes I do have them lol! I thought this design along with the stamp would make brilliant table placements for Christmas! What do you think?


I have used Promarkers to colour the stamp. What I like about the table placement idea is that you can colour the stamp to match your colour theme. Even if it is gold or silver, the leaves would look fabulous!


I have edged the stamp with Liquid pearls, this really makes the image "pop".


I have then added some berries from my stash and placed them around the image as well as using them as a buffer for the easel card.


Now because they are quite hard to glue down I had to use silicone glue, this could then be seen so I have used some "Fluffy stuff" to go around the berries to look like snow and sprinkled some glitter to look like the snow is shimmering!


I hope you have enjoyed looking! Please leave me some comments, I love hearing your feedback.


Happy crafting! Hugs Tina xx


Monday 11 October 2010

Listen to your Heart - By Sioux Jenneys

Hello everyone! It's my turn again and I'm here to share a card :)

I read somewhere that you could probably make a flower out of almost any stamp...it might have been Wendy Vecchi but I'm not sure!

Anyway.....I thought I'd see what I could come up with so here's a little idea :)


1. Start by stamping the leaves (16 needed) using the solid leaf from the Flower Power Plate in Distress Inks Peeled Paint and Shabby Shutters onto thin card - don't over ink the stamp so that you can create a variegated look to the leaves and try picking up some of each colour on a few of the leaves.....cut out leaving a narrow border - you don't have to be precise :) as you are going to tatter the edges and ink with Distress Ink Brushed Corduroy.

P.S. I've had my cheapo paper distresser ages but you can get a brand spanking new T!m one here.


2. Stamp the heart from Stitchels Curly Dot Plate in Jet Black Adirondack Archival four times onto old book paper overlapping at the centre

- again it does not have to be precise it all adds to the effect when they are layered up!


3. Add a dot of Adirondack Dimensional Pearls in Butterscotch and Terracotta where the little dot is on the stamp

- how convenient is that!

4. Repeat steps 2 and 3 another two times so you have 3 layers of petals.

5. Stamp the flower from Stitchels Curly Dot Plate twice and again add the dots in dimensional pearls.

6. Make the background on the card by brushing Adirondack Dimensional Pearls in Butterscotch and Terracotta with a dry brush using a very loose motion in various directions until you have covered the card to your liking :)

7. Draw a square using a Sharpie pen leaving a gap at the bottom for your chosen sentiment
....I chose a Stampers Anonymous T!m one and stamped it in Versafine Onyx Black

8. Assemble the parts for a pleasing layout and glue a large press stud to the centre of the large flower.


Job Done!
:) See you soon!
xoxo Artyjen

Saturday 9 October 2010

Getting To Know... Tina

Morning Peeps

Time for another Creative Team interview, this time with our Colouring Artiste extraordinaire, Tina Barnett. Tina joined us at the beginning of September and her flair with a ProMarker is just perfect... and she really brings our Mabel Lucie Attwell designs to life... here's the grilling I gave her...

AS Introduce yourself, please tell us about yourself, you interests, likes/dislikes etc Hi I'm Tina, from Tina's Crafty Place. I am married to Darren and we have a beautiful dog called Tommy. I live in Kent and work as an accountant and tax adviser. I have been crafting all my life but paper crafting for about 4/5 years. I love to work with Promarkers and bring to life stamped and digital images. I sit and colour most nights lol! I love altered art and scrapbooking also. I like most things crafty :0) xx George Clooney, Robert Pattinson. :0) xx Dislikes................. this is hard as I am quite easy going so I'm not sure............. oh wait baked beans! I hate them :0).


AS
What or who inspires you?
In the craft world, people who inspire me are Tim Holtz and my friends, Hels Sheridan, Linda Elborne, Dan99, this is VERY true, not just because they are my friends but because they are amazing artists! I am lucky enough to be on some amazing design teams, the artists on them and my team mates inspire me so much too, I love working with their images. My personal inspirations are my husband and family. They are always there to support me and they are amazing.


AS How do you make a piece of art... what is the process? Oh this can vary. Sometimes I could be out and about and see a design or image on something, like a poster or cover of a book, sweet wrapper anything, and I just get an idea that pops in to my head. If I make cards, then I start by colouring some images so that I have a few, I then see what takes my fancy :0), I lay papers next to the coloured images, see if it is bright and moden or a vintage look and pick my papers and colours from there. I use my own layouts most of the time but I love to use challenge layouts too. This really helps if you have a block, it gives you somewhere to start. I then choose everything else, ribbon, embellishments etc.


AS
If your Mojo goes on holiday, what do you do?
Find a sketch from a challenge or look at a magazine.

AS What is your favourite technique?
I love to colour! whether it be stamps or digi's, but I also love to use my melt pot and love to make jewellery with it :0)


AS
If you were on a desert island and could only have 5 items of stash with you, what would you take?
OMG!!! Don't say that to me I can never pack lite! Ok ok calm Tina, it's only a question...... ok ....can the complete range of promarker pens count as one?... I will take it as yes lol! number 2 would be images, 3 scissors, 4 card stock, 5 glossy accents............................. sorry it just can't be done, melt pot, paper trimmer, papers, ribbon, charms, ......................... sorry :0) xx
So... many thanks to Tina for letting us have a little nosey into her life... to see more of her amazing cards... click HERE... thanks for looking!!

Hels x

Thursday 7 October 2010

Leafy layers by Jennie

I haven't had a lot of time to experiment with the new technique first shown  by Wendy Vecchi using her Clearly for Art plastic, which will be available shortly in the shop (it sold out at Ally Pally)  However today in between getting ready for Port Sunlight show on Saturday , I die cut some Tattered leaves, and had a little play:))
I used Duralar which we sell in the shop, and has very similar properties to the Clearly for Art. You can die cut it, heat and shape it, and I also found that you can run it through the embossing folders! It works brilliantly! ( I always get ideas after I have finished making something and then run out of time!) This piece however doesn't show you this, as I tried it later after I had finished it. I promise I will do another piece next week showing this.

I alcohol inked up the leaves, and stamped them on the un-inked side with Black Archival ink, using the dotty background stamps. Then gently heat with a heat gun and mould over a glass or a pencil works brilliantly. The plastic will mould naturally when heating it, but you can manipulate it while warm.

I ran the postcard through Tim's Alterations spiders web embossing die , and coloured it with distress inks. A lovely plastic ( is it a dragonfly? ) creature from a toy shop, was used as a spider, since I still cannot find my little black ones.. come out , come out wherever you are hiding in my craft room!!! lol

I am entering this into our Layering it On challenge. Am I allowed to win?? I don't think so!! but please have go, we give away £15.00 worth of stamps every month.
I will be at Port Sunlight on Saturday demoing this technique along with metal embossing and anything else I can cram onto a tag! So please say hello if you are coming along.
Have an extremely creative day!
Jennie

Tuesday 5 October 2010

Winner of the Rainbows Challenge!

I am a little late with choosing the winner of last month;s blog challenge, but I am sure you will forgive me? you will won't you? lol
I put all the entries in Mr Random.org and the winner is....drum roll please....
with this gorgeous piece!

Congratulations , Jack, Please email me  so you can claim your prize :))
Thank you to everyone who joined in, and don't forget this month's challenge is Layers, which you can enter here.
Have a very Creative day
Jennie 

Monday 4 October 2010

Thank You CAS! By Sioux Jenneys

**Pssst... tis me... Hels... just wanting to say... a HUGE warm welcome to Sioux... we are very honoured that Sioux has joined our Creative Team... I will shut up now and hand over to Sioux who has made some DIVINE art for you to look at!**


Hello everyone! It's great to be here for the first time sharing what I love doing best with you all :)


I know it's not like me.....you know how very messy I can get don't you?!
But I thought this divine Gibson Girl from The Artistic Stamper deserved to shine on her own :) so this "clean and simple" card evolved.


1. Stamp the Gibson Girl 4 in Distress Ink Rusty Hinge onto watercolour paper for a bit of added texture.....tatter the edges and ink with Distress Ink Walnut Stain then blend Distress Ink Pumice Stone round the edges with Cut and Dry Foam.

2. Place the stamped square on the card front and lightly mark in pencil where the top and bottom corners are on the base card.

3. Mask off a portion of the Punk Plaid background stamp with sticky tape


.....ink it up with Distress Ink Brushed Corduroy
(I used black to take the photo so that it showed up better)

4. Take off the sticky tape!!!!
(Don't laugh...I've forgotten to do that important bit lots of times!)

5. Stamp the plaid over one of the pencil marks.

6. Repeat steps 3, 4 and 5

7. Add some Prima Pearls PM300692 and a sentiment of your choice.

Job Done!

I hope you liked my first post here :)
See you soon!
xoxo Artyjen

Saturday 2 October 2010

The Raven Triptych - By Lynn Stevens

When I was asked to be A Guest designer for the month of Oct. for The Artistic Stamper
I knew I wanted to create something really special for Halloween and I knew just the stamp that would do it. This Raven Airmail bird stamp was the inspiration for my piece.


Close up of The Raven.
left side
Right side.
I hope you enjoyed my Halloween post, now go get those spooky creations done.
Halloween will be here before you know it!
You can see more of my work on my blog Trash To Treasure Art
Lynn Stevens


PS... This is just Hels popping in to let you know that poor Lynn has been very poorly and from all the Creative Team we are wishing her a speedy recovery... lotsa hugs for Lynn...

Friday 1 October 2010

Layering It On... The October Challenge

Goodly Morning peeps... THANK YOU all for your lovely colourful entries in the September Rainbow Challenge. The Winner of the Candy will be announced in a few days when Jennie gets back from the Artisan Show. I have chosen this months theme and you all know how I love to add layers to my projects... so the theme is... LAYERS!


I altered an Ikea photoframe by layering lots of strips of Nostalgic Tissue Tape over it so it was entirely covered and then colouring it with Brushed Corduroy Distress Ink. I made a little centrepiece using white card, coloured with more Distress Inks, this time; Mustard Seed, Spiced Marmalade, Barn Door, Broken China and Vintage Photo. I stamped a Tim Holtz sentiment - I love this one, it has to be one of my faves - and then adding some backgroundy sprigs using Pine Needles DI and a few butterflies using Rusty Hinge and Aged Mahogany DI's.


I used some Grungepaper, StaZon and Distress Inks to make some flowers - the stamps I used are: Flower Power, Flower Blooms and Flower Fever and then overstamped with lots of background stamps. I added a little dimensional butterfly using one of the new Steampunk Stamp sets - overstamping him with a lacey background. I cut a few leaves from the new Tim Holtz Tattered Leaves Alteration Die and embossed these with Texture Fades... colouring with Crushed Olive, Forest Moss and finally Aged Mahogany to get an autumnal look to the leaves... All of these layers were stuck together with Glossy Accents... gotta love that as a glue... I added a little gem into the centre of the flowers and popped a couple of pins from my stash behind to jazz them up a bit.


So... that is my entry... what will you make for yours? The rules of the challenge are simples...make a piece of art (it can be absolutely anything) including the theme... once you have blogged it (or added it to your Flickr or similar account), leave a comment here for us with a link to the place you are showing your entry, add your deets to the Froggy-link and we can come and see your entry. If you use Artistic Stamper stamps in your piece, then your name will be entered twice into the draw. The winner will be chosen at random and announced at the beginning of next month... the prize up for grabs is £15 worth of Artistic Stamper stamps of your choice, plus the KlingOn to mount them onto! Thanks for looking... have lots of inky fun!

Hels x